SynthBlocks
Scratch-style blocks that compile to real G-code. Snap geometry, loops, math, and travel together on a visual canvas—then preview the toolpath in 3D and send it to the printer. No syntax to memorize, no compiler errors to chase. Built for classrooms, maker spaces, and anyone who thinks better in shapes than in text. Want a node graph instead? That is Node Sculptor.
Drag, snap, print
The canvas is the lesson: every block shows where it fits, and the viewer answers “did it work?” before anyone wastes a gram.
- Block canvas — drag from the toolbox, snap pieces together; the shape of each block shows where it fits.
- Instant 3D preview — every change recompiles and updates the viewport; orbit, zoom, scrub layers before anything touches plastic.
- No syntax errors — blocks only connect where the types match; learners spend time designing, not debugging brackets.
- Undo and seed — full undo stack plus a deterministic seed so the same program always produces the same output.
- Presets and save — store block programs in
.3dsynthprojects or share them through the Library (Premium).
Ten categories, one toolbox
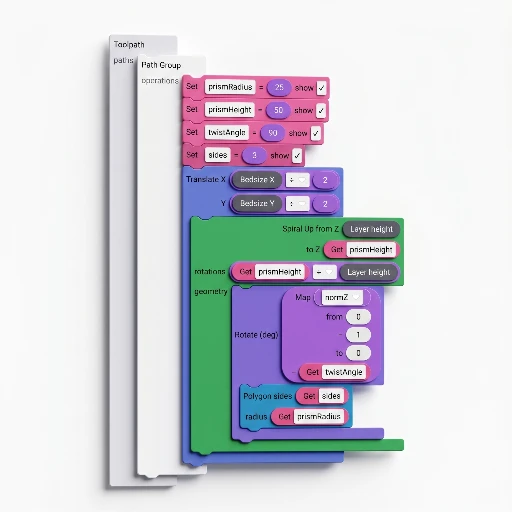
The sidebar groups blocks by purpose. Structure sets the skeleton; Geometry fills it with shapes; Math wires the numbers; Process and Travel control the nozzle. Everything snaps onto the same canvas.
Structure
Loops, conditionals, sequences, polar and grid arrays: the control flow that decides how many times and where.
Geometry
Circle, rectangle, polygon, star, spiral, slot, Bézier, arc, sine wave, text, and fill: the shapes the nozzle traces.
Math
Trig, noise, map-range, clamp, random, and context variables (z, layer index, normalized height) that make geometry respond to position.
Process and travel
Speed, flow, temperature, fan, retraction, custom G-code, and absolute/relative travel: full nozzle control without memorizing M-codes.
Math class meets the build plate
Abstract concepts land differently when the result is a physical object you can hold. SynthBlocks turns a lesson on sine waves or for-loops into a vase, a coaster, or a pencil holder—printed on the classroom’s own machine.
- Trigonometry — sine, cosine, and atan2 blocks shape curves students can see layer by layer.
- Variables and iteration — set a variable, loop over a range, watch the geometry change: programming fundamentals, made tactile.
- Coordinate systems — absolute and relative travel blocks teach X / Y / Z thinking with a real build volume as the stage.
- Deterministic output — same seed, same result: students can reproduce each other’s prints and reason about why.
- No install — runs in the browser; one link, a class full of screens, minimal IT overhead.
From blocks to G-code
Blocks compile to an intermediate representation, then to points and G-code in one pass—the same engine behind every preview and every export.
Compile
The workspace tree-walks into a typed IR; invalid connections are caught before generation starts.
Preview
Points stream into the 3D viewer with travel vs extrusion coloring; orbit, scrub, and inspect before committing filament.
Export
One click writes a .gcode file with your printer’s start/end scripts, temperatures, and retraction baked in.
Print settings
Bed size, layer height, nozzle width, and line width are blocks too: the program reads the machine it will run on.
Block library
Same families as the in-app toolbox—each link opens the matching article in the documentation. For walkthroughs, open Tutorials in the app.
Structure
Geometry
Z strategy
Transforms
Process
Math
Library
SynthBlocks in the wild.
Real projects from the community library. Click any thumbnail to open in the app and remix.
Build it in the app.
Free to tinker. Open SynthBlocks, drag a few shapes, wire them with loops, and preview the toolpath in 3D.